
.svg)


Sommaire
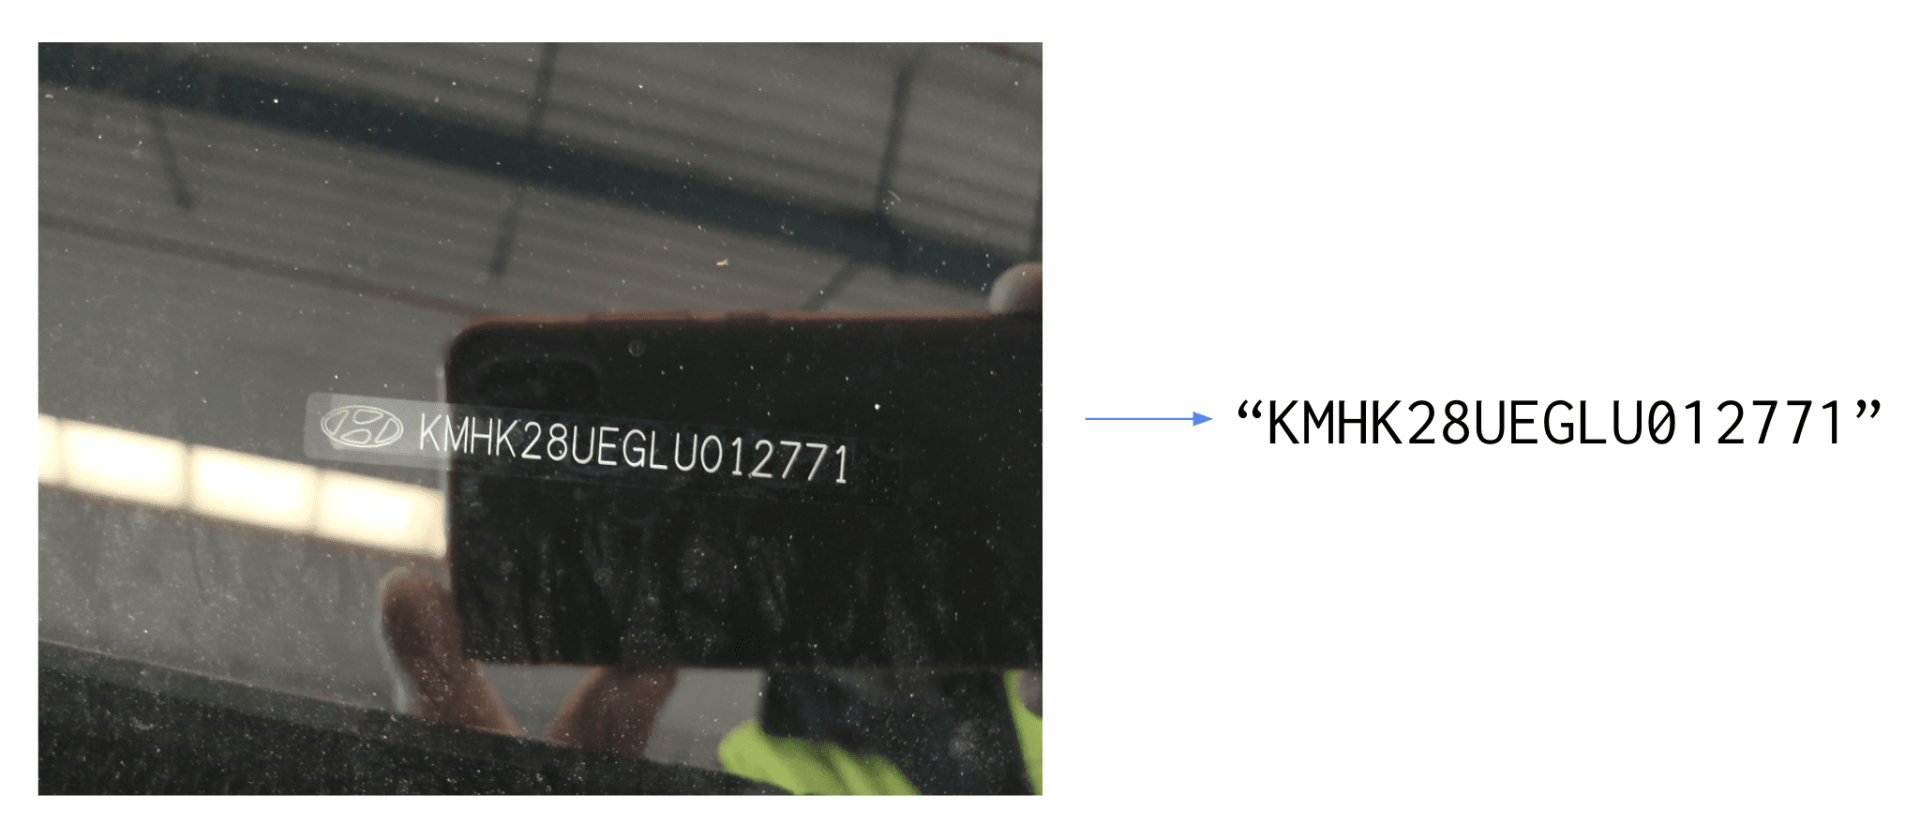
The VIN (Vehicle Identification Number) is a 17 character string composed of digits and capital letters that serves as the car’s fingerprint. It can help in identifying any car during its lifetime, and in getting specific information about it. This unique identifier is printed somewhere on the vehicle during manufacturing so that people can read it when they need it in some processes such as car rental or selling.
A few months ago, we were contacted by our friends from Monk: an AI company delivering state-of-the-art computer vision solutions for the automotive, insurance, and mobility markets. They are building a visual intelligence technology able to inspect any car in the world during every stage of the vehicle lifecycle.
Their sole focus is to build the best technology for detecting, classifying, and estimating damages on vehicles. Being able to read VINs automatically is important for them but not core business, that’s where Mindee gets in the game.
The VIN use case
Please note that any photo of VIN in this article was either voluntarily falsified or blurred.
The problem definition is simple:
- the input is a photo of a VIN written on a car
- the output is a 17 characters length string: the VIN
Performing this task automatically with high accuracy is harder than it looks. The main difficulties are:
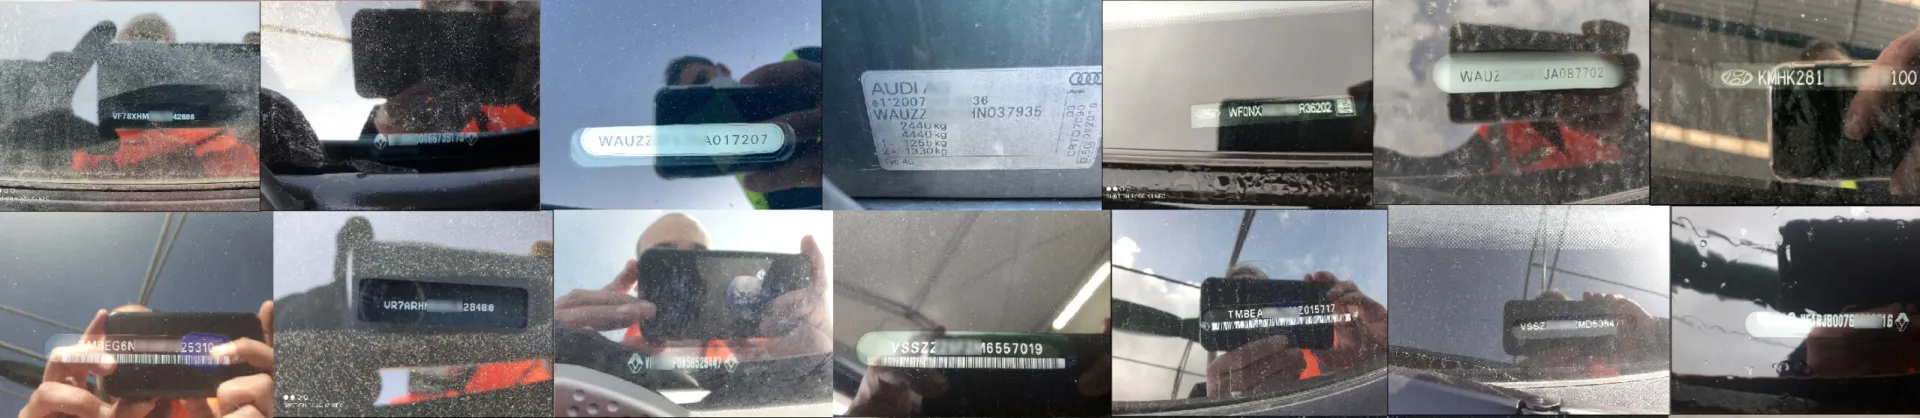
- The input photos are mostly taken outdoor, with a lot of noise (brightness, water stains, shadows…) that can make the detection and the recognition of the VIN difficult
- Although the VIN is written in a pretty standard format, the fonts used are not standard, not always the same, and the letter spacing can vary a lot.
- A checksum validation method exists to validate VINs, but it’s not working for all vehicles. We rejected this post-processing solution.
- Last but not least, the VIN is not always the only text written in the photos, using a traditional OCR approach is not enough as we’d need to add a layer of post-processing to filter out the unwanted characters.
A few examples of noisy images:

The first thing we did was to run off-the-shelf OCRs, both from open source libraries and cloud-based APIs. Because of the nature of the problem, the results were not good enough on the text detection and recognition. VINs are written on cars, not documents, and it’s not a common use case for character recognition technologies. We had to find another approach using Python and docTR.
Why use docTR?
DocTR is a Python Optical Character Recognition library for data scientists and developers. The end-to-end OCR is achieved using a two-stage approach: text detection (localizing words), then text recognition (identifying all characters in the word).
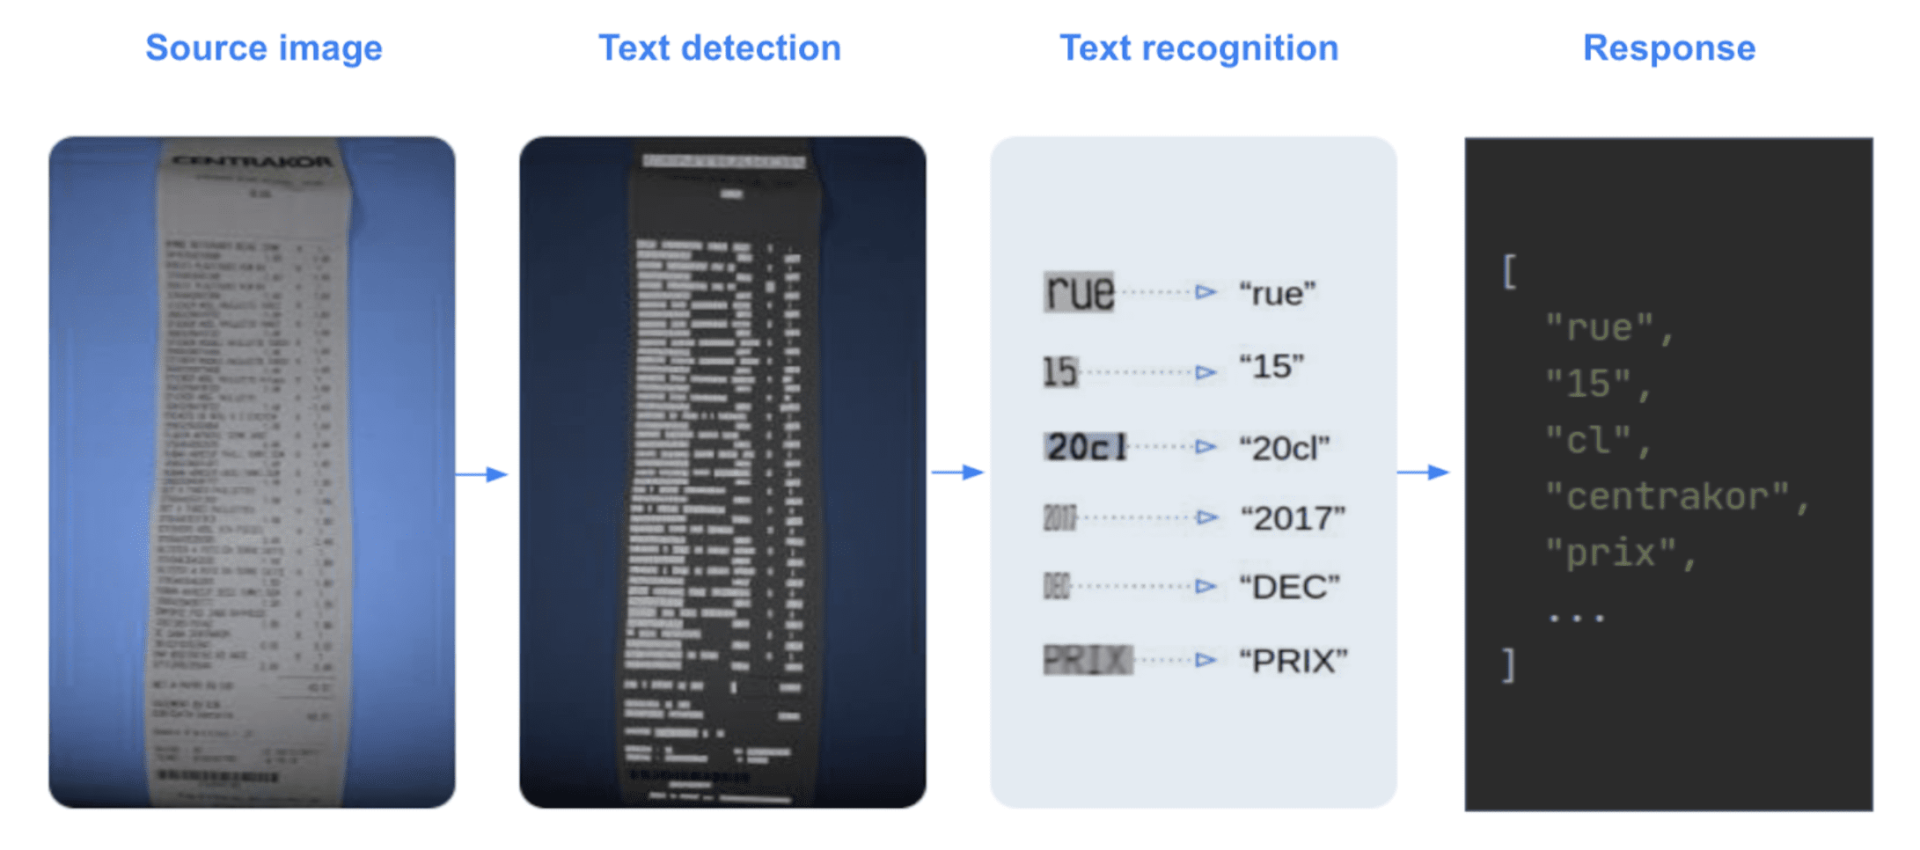
DocTR includes pre-trained models for both the detection and the recognition tasks. Anyone can use it for extracting words from an image or a pdf. You can test it out very easily (more information in docTR documentation)
1. Installation
2. Python hello world
But as we mentioned earlier, no OCR was working well on our VIN problem. General-purpose OCRs are not a good solution for this use case because:
- OCRs are meant to be generic, and the problems of text detection and text recognition are very hard when it comes to “In the wild” data such as photos of VINs.
- Generic OCRs’ output list the characters written in the image, and even if all of them are accurately detected, how do you reconstruct the VIN string out of it?
To get rid of those constraints, we decided to fine-tune docTR models on VIN data for both the detection and recognition tasks to get better performances. This way, the detection will only extract the VIN characters (not surrounding characters), and we’ll have a fine-tuned model for reading them. The library includes those training capabilities for the detection and recognition stages based on pre-trained models. Fine-tuning our models on VIN data can be achieved very easily thanks to those pre-trained models: we should get high accuracy as they were pre-trained on millions of various data.
Our contributors are frequently adding state-of-the-art models to the library. Here is the list of available models as of today:
Text Detection
- Real-time Scene Text Detection with Differentiable Binarization.
- LinkNet: Exploiting Encoder Representations for Efficient Semantic Segmentation
Text Recognition
- An End-to-End Trainable Neural Network for Image-based Sequence Recognition and Its Application to Scene Text Recognition.
- Show, Attend and Read: A Simple and Strong Baseline for Irregular Text Recognition.
- MASTER: Multi-Aspect Non-local Network for Scene Text Recognition.
This is how we nailed the VIN extraction case with Nicolas Schuhl.
Our dataset
We have 5,000 photos of VINs taken with different devices, all of them being from different vehicles. That’s a good start! Nicolas told us that they have a template of layout in their mobile application for the photo capture, enforcing the user to take a picture with the right orientation. That makes the problem easier because we can assume the input images are in the right orientation. It also helps us make sure that VINs are not too skewed: we can consider a maximum absolute skew angle of about 5°.
Our dataset contains photos with wrong orientations and skewed VINs with angles above 5°. We removed skewed photos above 5° plus a small delta (not 5° to keep some hard cases in the training set), from our dataset and changed the orientation to get every photo straight.
We took 75% of the data for the training, 15% for the validation, and 10% for the test set that we carefully put aside.
Annotating the text detection dataset
DocTR text detection models output a segmentation heat map of the image, as well as the list of interpolated polygons in relative coordinates.
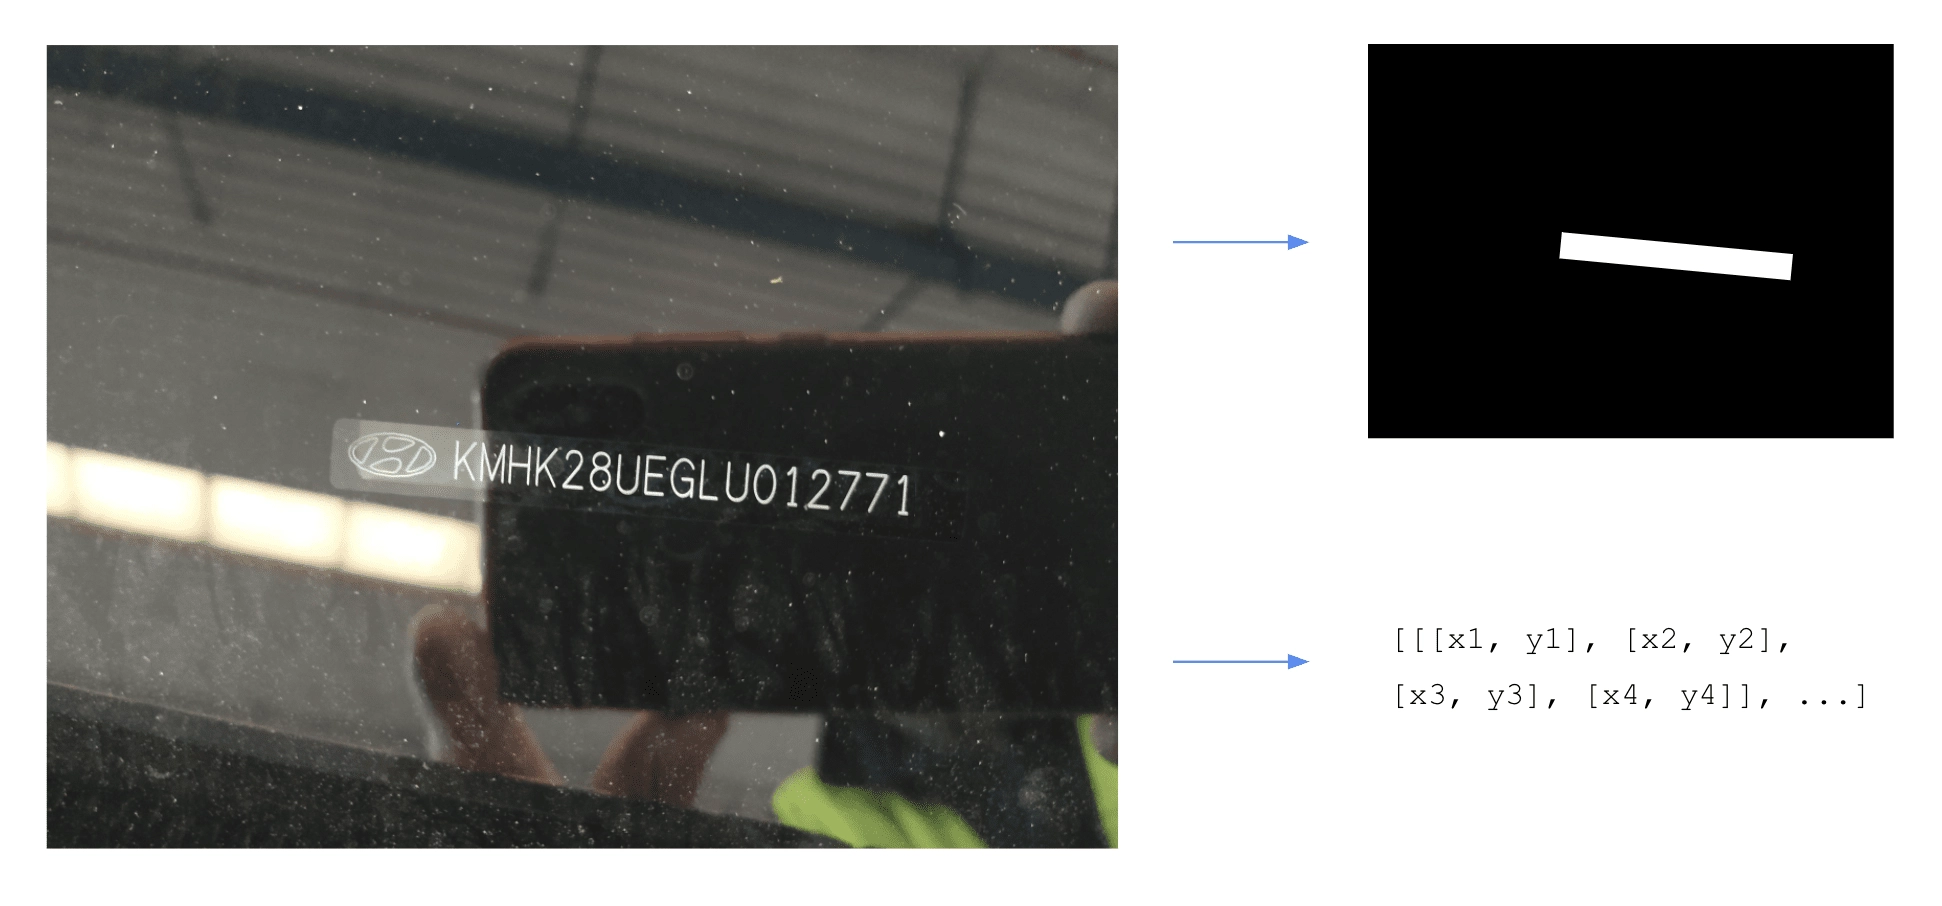
In order to train this model, we need to provide for each image the set of polygons corresponding to the position of the text we are looking for. You can find more information on docTR references.
In our case, the label for each image is a single polygon, representing the position of the VIN in the image.
The training and validation sets have to be structured in folders this way:
The labels.json file map the input filename to their polygons labels:
We used our internal tool for annotating this data, but you can find many great commercials (such as V7 or Kili) or open-source (a great benchmark here) software for doing this.
Annotating the text recognition dataset
Within the docTR end-to-end pipeline, the text recognition model takes as input crops of the input image that were detected in the first text detection stage. This algorithm will then perform the “reading” task on those crops in order to get a machine-encoded string.

Annotating the recognition dataset is a bit more tedious than the detection. We used again our internal tool that includes a pre-annotation feature using a general-purpose text recognition algorithm to make it easier. It’s indeed easier to correct a few characters than type all of them manually from scratch. You can find this feature on many commercial annotation software.
For the text recognition task, docTR requires the datasets folders to be structured the same way as the text detection and the labels.json file should map every input filename with a unique associated string:
The labels.json file map the input filename to their output string:
Training the models
Now let’s jump to the fun stuff! As you may imagine, the real process was actually many back and forth between training experiments and data cleaning to improve the performances. But for the sake of this article, let’s consider that the dataset was perfectly annotated the first time.
We are going to train our models using the TensorFlow 2 (TF) backend: this can also be achieved using the PyTorch backend as the steps are very similar. You can install docTR using either TF or PyTorch backend this way:
Tensorflow
PyTorch
Make sure you have the 4 required folders of annotated data such as:
Text recognition model training
Let’s start with the text recognition algorithm.
1. Install docTR
2. Clone the repository somewhere on your laptop
3. Navigate to the docTR repo you just cloned, and get into the recognition references folder. The references/recognition folder contains a training script for both TensorFlow and PyTorch.
4. Launch the training using the sar_resnet31 (This model using a Resnet 31 backbone)
—pretrained: Will train the model starting from docTR – SAR with Resnet31 backbone trained model’s checkpoints.
—wb: Will launch an experiment on Weight & Biases. You could also use
—tb: si vous souhaitez utiliser TensorBoard à la place.
Selon les spécifications de votre machine, si vous ne disposez pas de suffisamment de mémoire, il est possible que vous obteniez une erreur de mémoire insuffisante (OOM). Si cette erreur se produit, diminuez la taille du lot à l'aide du paramètre -b :
-b : Taille du lot
L'étape de validation a lieu après chaque époque, et les points de contrôle seront enregistrés dans le dossier de références si la perte de validation est la plus faible de toutes les époques.
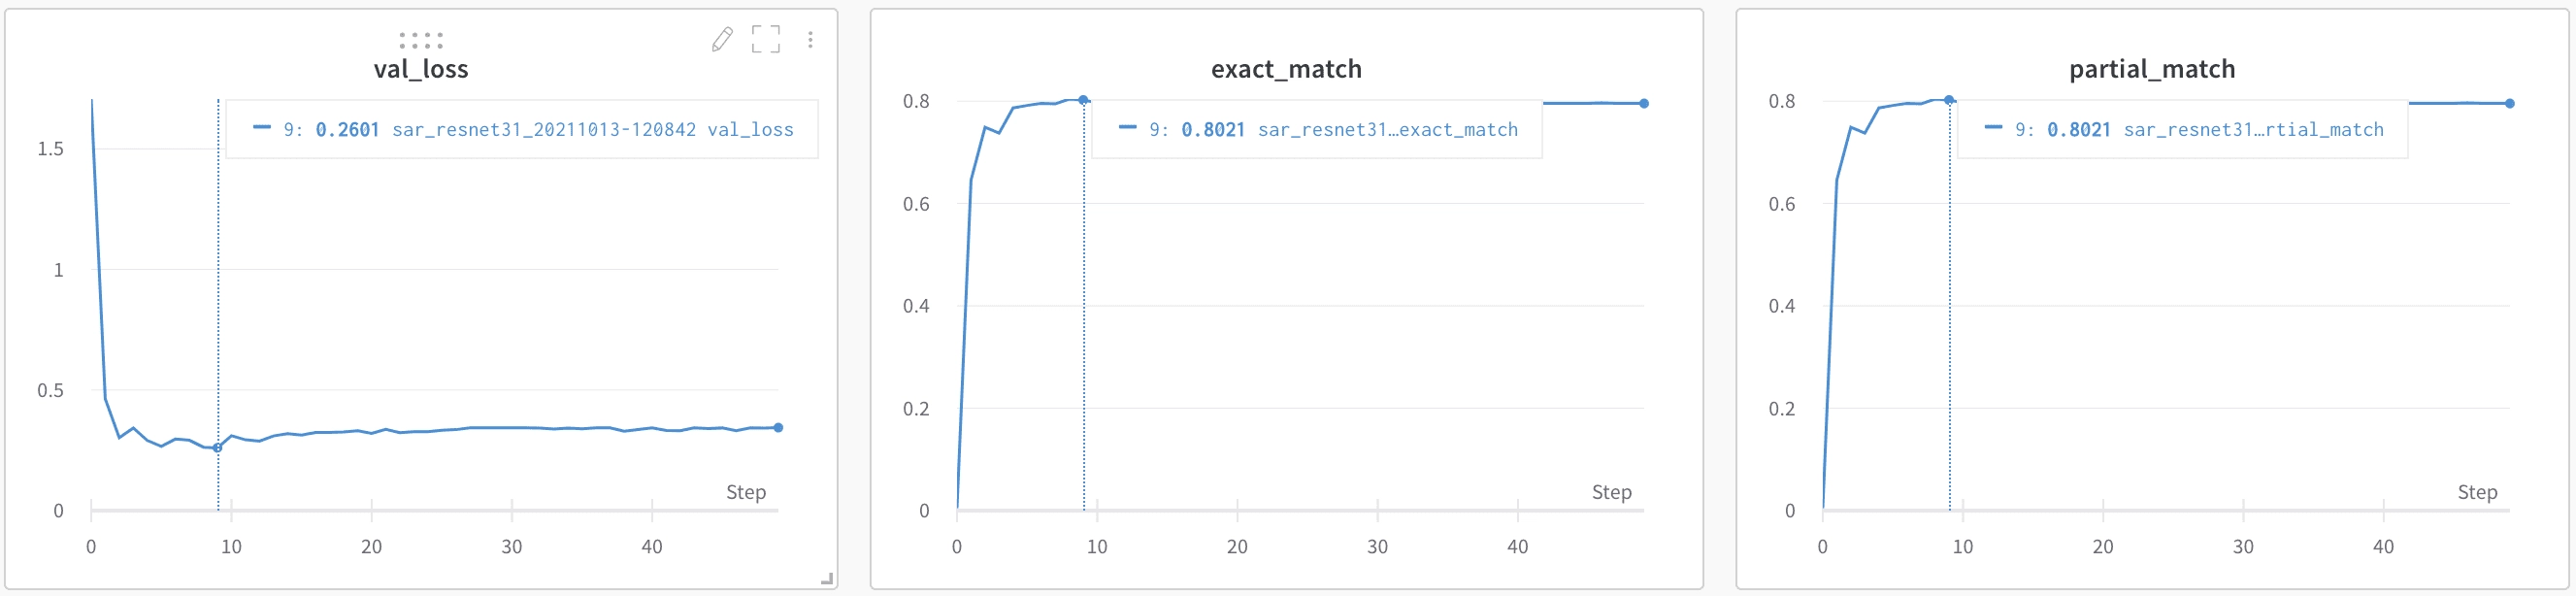
Le modèle converge très rapidement et a pu obtenir une correspondance exacte de 80 % sur l'ensemble de validation. Cela peut sembler peu, mais c'est parce que nous avons décidé de mettre des données faussées dans l'ensemble d'entraînement. Nous allons bientôt calculer les métriques de bout en bout, car c'est la plus importante, et nous verrons comment cela se passe.
Formation sur les modèles de détection de texte
Pour le modèle de détection de texte, voici les étapes à suivre :
- Accédez au dossier /references/detection
2. Lancez la formation à l'aide du db_resnet50 (Ce modèle (à l'aide d'un backbone Resnet 5.0)
Le modèle de détection est plus lourd que le modèle de reconnaissance : il est plus probable que vous obteniez l'erreur OOM sur celui-ci. Encore une fois, pensez à diminuer la taille du lot si cela se produit.
Il est très important d'utiliser un modèle préentraîné pour cette tâche. Le modèle DocTR a été entraîné à détecter n'importe quel mot dans les images, et nous recherchons uniquement des VIN. En réentraînant ce modèle uniquement sur les VIN, nous affinons le modèle pour détecter uniquement les VIN et filtrons tout texte environnant.
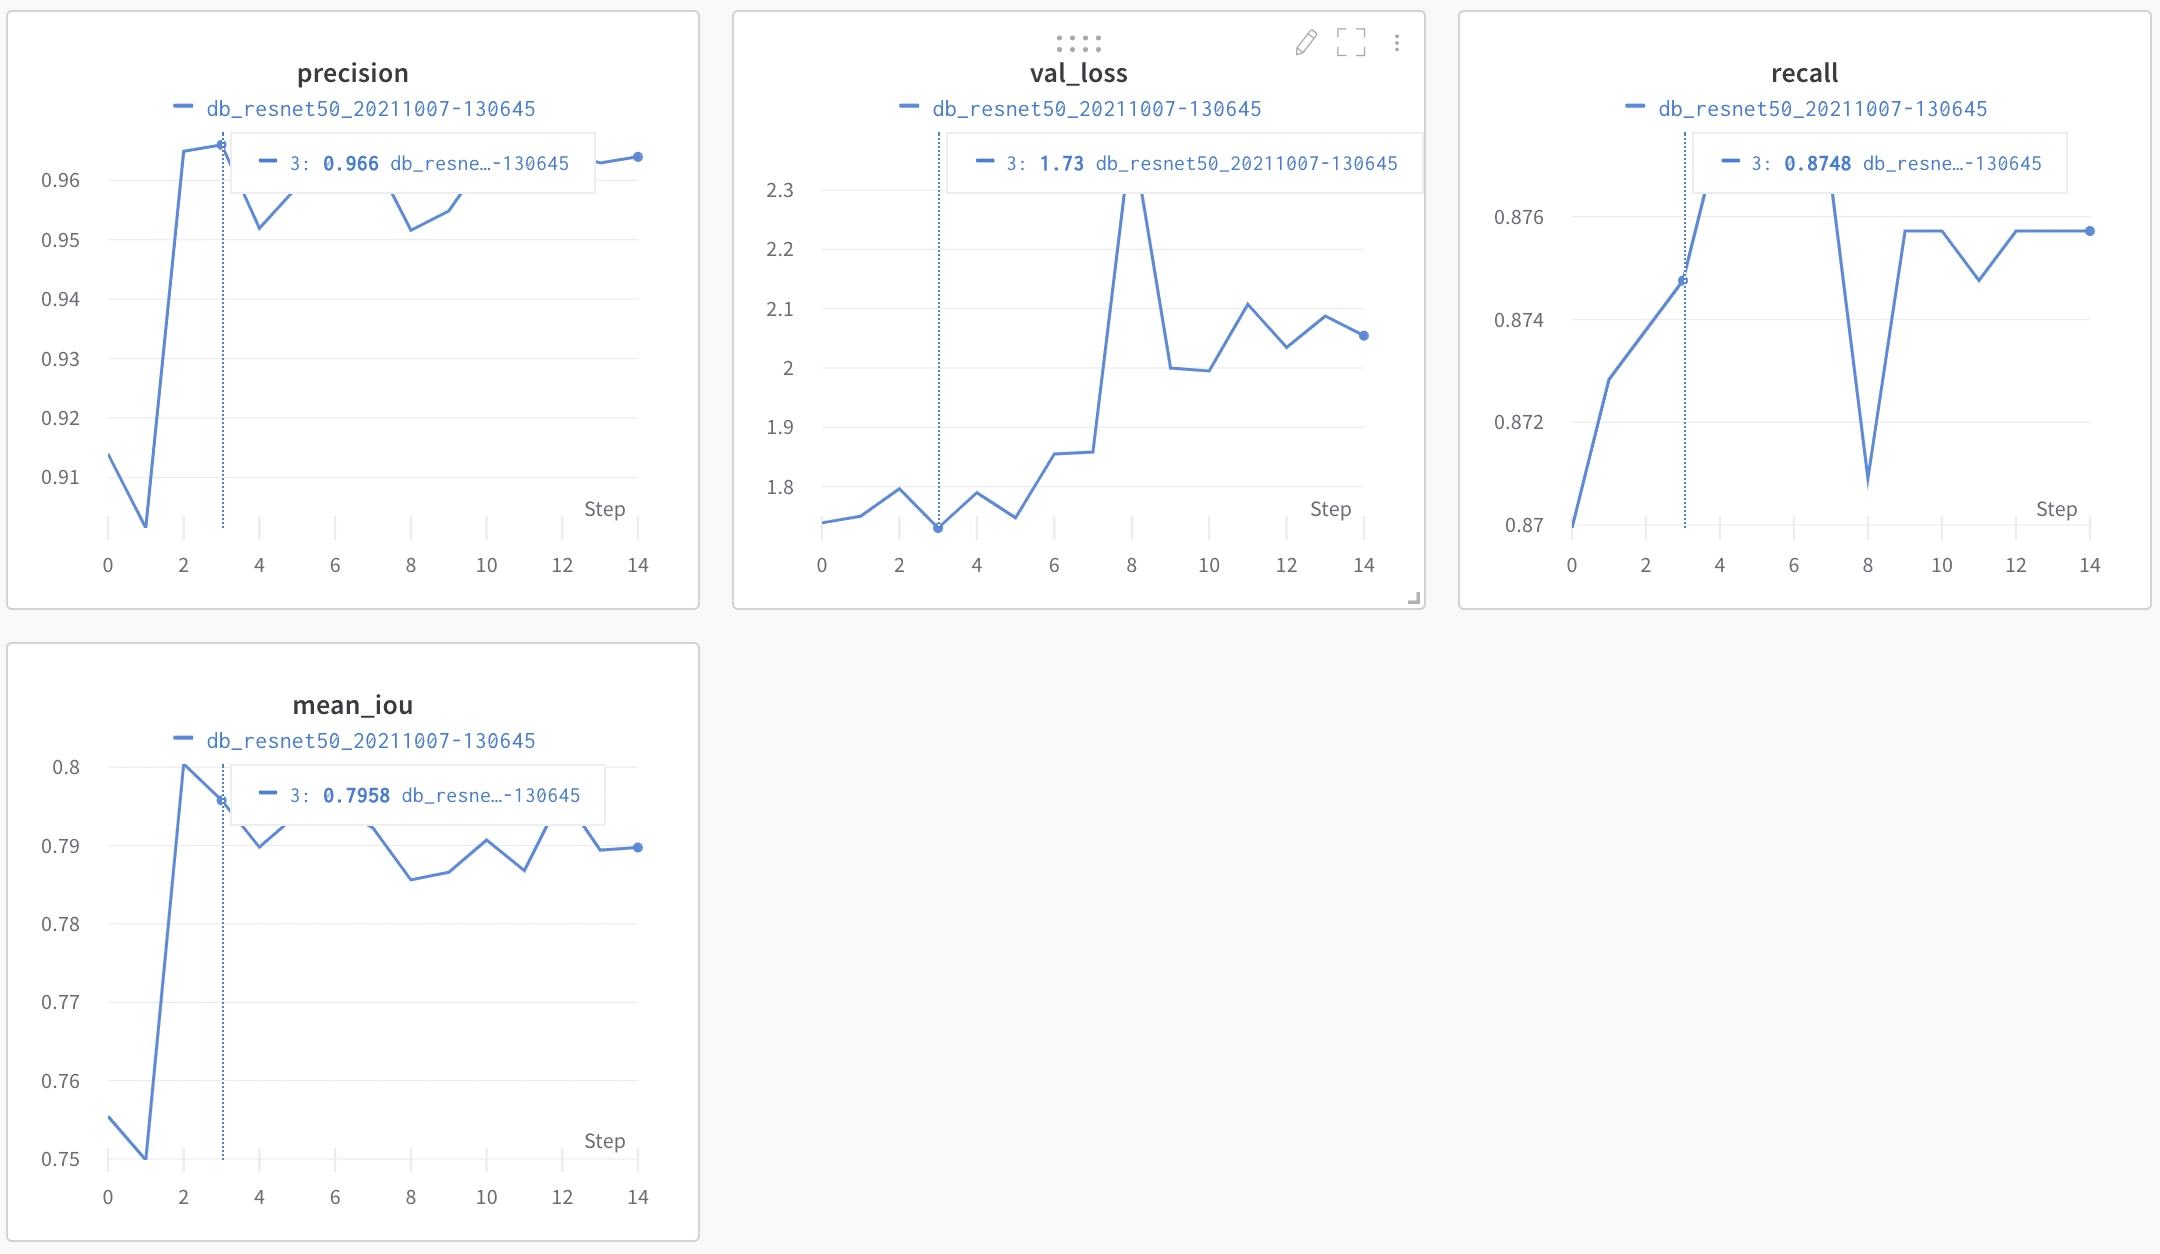
Les métriques de détection sont un peu plus difficiles à analyser que celles de reconnaissance. La précision semble cependant très élevée, mais comme l'IoU n'est pas facilement exploitable, nous déterminerons les performances des modèles en testant le pipeline de bout en bout.
Tester les modèles entraînés
Nos modèles ont été enregistrés dans le dossier de référence du référentiel DocTR cloné.
Pour voir les modèles fonctionner en action, le code est assez simple :
Il n'y a aucune raison pour que l'algorithme de détection de texte corresponde parfaitement à la taille des cases qui optimise l'algorithme de reconnaissance de texte. Pour trouver le meilleur paramètre, nous avons affiné le paramètre unclip_ratio par rapport à l'ensemble de validation. Il s'agit du facteur à utiliser pour développer les polygones en sortie à partir du modèle de détection afin de générer une zone carrée qui peut être introduite dans le modèle de reconnaissance de texte. Comme les deux modèles ont été entraînés séparément, il n'y a aucune raison que le paramètre par défaut soit le meilleur pour optimiser les performances de reconnaissance de texte.
Après avoir testé les modèles entraînés sur notre ensemble de tests, nous avons obtenu une correspondance exacte de 90 % de bout en bout, ce qui est excellent compte tenu du faible nombre de données et de la complexité du cas d'utilisation. Si nous l'avions voulu, nous aurions pu passer plus de temps à optimiser le modèle avec quelques idées :
- Les modèles de détection ont été entraînés sur des cases carrées. DocTR prendra bientôt en charge les boîtes pivotées, ce qui devrait nous donner une meilleure robustesse pour les photos biaisées.
- Ajustement des hyperparamètres : nous n'y avons pas consacré beaucoup de temps. Nous avons remarqué par exemple que le déclin de l'apprentissage a un fort impact sur la formation. Nous avons testé quelques valeurs manuellement, mais nous aurions pu passer plus de temps à effectuer une recherche par grille pour ces paramètres. Les tailles d'entrée peuvent également être importantes et nous avons utilisé les paramètres DocTR par défaut.
- Modèle pré-entraîné de reconnaissance de texte uniquement pour la partie dorsale de l'algorithme: bien qu'il soit très agréable d'avoir des modèles préentraînés, nous ne sommes pas libres d'utiliser le vocabulaire que nous voulons lorsque nous les utilisons. Nous avons demandé à l'équipe DocTR s'il était possible d'obtenir des modèles préentraînés uniquement pour la partie dorsale des algorithmes de reconnaissance de texte, afin de pouvoir entraîner les têtes de classification avec nos vocabulaires spécifiques. Un problème a été ouvert et ils y travailleront bientôt.
- Bien sûr, plus de données...
Conclusion
Ce cas est un bon exemple de problème d'extraction de texte de bout en bout qui nécessite un nouvel entraînement des couches de détection et de reconnaissance pour obtenir de meilleures performances. Utiliser un OCR générique et essayer d'extraire les informations clés que vous souhaitez peut être très fastidieux. Vous devrez ajouter beaucoup de post-traitement à vos résultats d'OCR bruts et il est peu probable qu'il soit efficace pour les tâches simples de détection et de reconnaissance de texte.
À propos
.svg)
.webp)
.webp)

.webp)